

Vue3
Vue3的优势
更容易维护:
- 组合式API
- 更好的TS支持
更快的速度:
- 重写diff算法
- 模版编译优化
- 更高效的组件初始化
更小的体积:
- 良好的ThreeShking
- 按需引入
更有的数响应:
- Proxy
创建Vue3项目
1.前提环境条件
已安装 16.0 或更高版本的 Node.js
node -V 查看node版本号
2.创建一个Vue应用
npm init vue@latest
这一指令将会安装并执行 create-vue
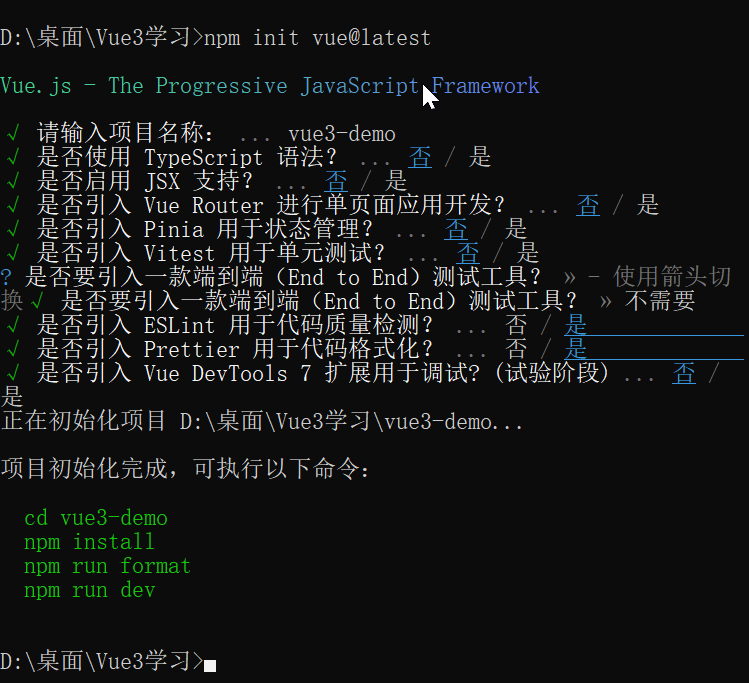
之后安装依赖npm i ,就能运行了
项目关键文件
1.vite.config.js - 项目的配置文件 基于vite的配置
2.package.json - 项目包文件 核心依赖项变成了 Vue3.x和 vite
3.main.js - 入口文件 createApp函数创建应用实例
4.app.vue - 根组件 SFC单文件组件 script-template -style
- 变化一:脚本script和模板template顺序调整
- 变化二:模板template不再要求唯一根元素
- 变化三:脚本script添加setup标识支持组合式API
5.index.hlml - 单页入口 提供id为app的挂载点
入口文件解释
import'./assets/main.css

// new Vue()创建一个应用实例 =>createApp()
//createRouter()createStore()
//将创建实例进行了封装,保证每个实例的独立封闭性
import {createApp }from 'vueimport App from"./App.vue

// mount 设置挂载点 #app(id为app的盒子)
createApp(App).mount('#app')
插件
volar-目前(2024/9/28)叫Vue - Official用于Vue3
vetur插件用于Vue2
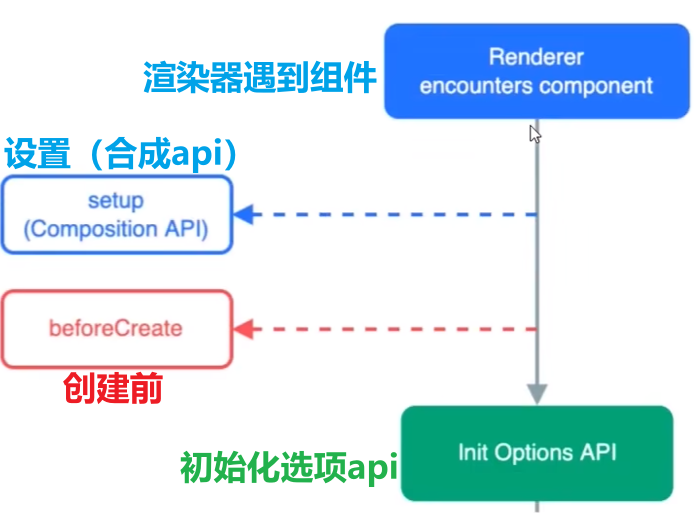
组合式API-setup选项
setup选项语法和执行时机
语法:
<script>
export default {
	setup () {},
	beforeCreate () {}
<script>
执行时机(在beforCreate这个生命周期函数前就执行了):
setup语法特点:(需要导出和return,数据多了会很麻烦)
<script>
export default {
  setup() {
    const msg = 'Vue3学习'
    const showMsg = () => {
      console.log(msg)
    }
    // 定义好的数据需要一个一个return,非常麻烦
    return {
      msg,
      showMsg
    }
  }
}
</script>

<template>
  <div>{{ msg }}</div>
  <button @click="showMsg">展示</button>
</template>
<script setup> 语法糖
所以用到了 后面写setup),不需要导出和返回,就能使用
<script setup>
const msg = 'Vue3学习'
const showMsg = () => {
  console.log(msg)
}
</script>
<template>
  <div>{{ msg }}</div>
  <button @click="showMsg">展示</button>
</template>
setup中的this指向undefined
组合式APl-reactive和ref函数实现响应式
reactive()
作用:接收对象类型数据的参数传入并返回一个响应式的对象
核心步骤:
<script setup>
// 导入reactive
import { reactive } from 'vue
//执行函数 传入参数 变量接收
const state = reactive(对象类型数据)
</script>
1.从 vue 包中导入 reactive 函数
2.在 <script setup> 中执行 reactive 函数并传入类型为对象的初始值,并使用变量接收返回值
ref()使用多
作用:接收简单类型或对象类型数据的参数传入并返回一个响应式的对象
核心步骤:
<script setup>
// 导入ref
import { ref } from 'vue
//执行函数 传入参数 变量接收
const state = ref(简单类型或对象类型数据)
</script>
1.从 vue 包中导入 ref 函数
2.在 <script setup> 中执行 ref 函数并传入初始值,并使用变量接收返回值
<script setup>
// 导入ref
import { ref } from 'vue
// 执行函数 传入参数 变量接收
const count = ref(0)
const showMsg = () => {
  // 在js中需要用 .value接收
  count.value++
}
</script>
<template>
  <!-- 在template中直接用接收的返回值,不需要 .value  -->
  <div>{{ count }}</div>
  <button @click="showMsg">++</button>
</template>
组合式APl-computed计算属性
<script setup>
  // 导入
  import { ref, computed } from 'vue'
  const arr = ref([1, 2, 5, 8, 9])
  const computedArr = computed(() => {
    return arr.value.filter((item) => item > 2)
  })
</script>
<template>
  <div>原始数据:{{ arr }}</div>
  <div>计算后的数据:{{ computedArr }}</div>
</template>
组合式API-watch侦听
基本语法:
<script setup>
// 导入
import { ref, watch } from 'vue'

// 声明响应式数据
const num = ref(0)
const name = ref('kaka')

// 声明更改函数
const numAdd = () => num.value++
const nameGai = () => (name.value = 'biubiu')

// watch(ref对象,回调函数) 侦听一个
watch(num, (newValue, oldValue) => {
  console.log('侦听一个', newValue, '————', oldValue)
})
// watch([ref对象1,ref对象2],回调函数) 侦听多个
watch([num, name], (newArr, oldArr) => {
  console.log('侦听多个', newArr, '————', oldArr)
})
</script>
<template>
  <div>{{ num }}</div>
  <div>{{ name }}</div>
  <button @click="numAdd">num++</button>
  <button @click="nameGai">nameGai</button>
</template>
immediate进入页面立即执行
配置语法:(回调函数后面再接一个对象参数,里面配置immediate)
watch(ref对象,(newValue, oldValue) => {
    console.log(newValue, oldValue)
  },
  {
    immediate: true
  }
)
deep 深度侦听(默认没有开启)
配置语法:(回调函数后面再接一个对象参数,里面配置deep)
watch(ref对象,(newValue, oldValue) => {
    console.log(newValue, oldValue)
  },
  {
    // 深度侦听
    deep: true,
    // 进入页面立即执行
    immediate: true
  }
)
侦听对象中具体的某个属性
配置语法:不用配置deep
watch(()=>ref对象.value.xxx,(newValue, oldValue) => {
    console.log(newValue, oldValue)
  },
)
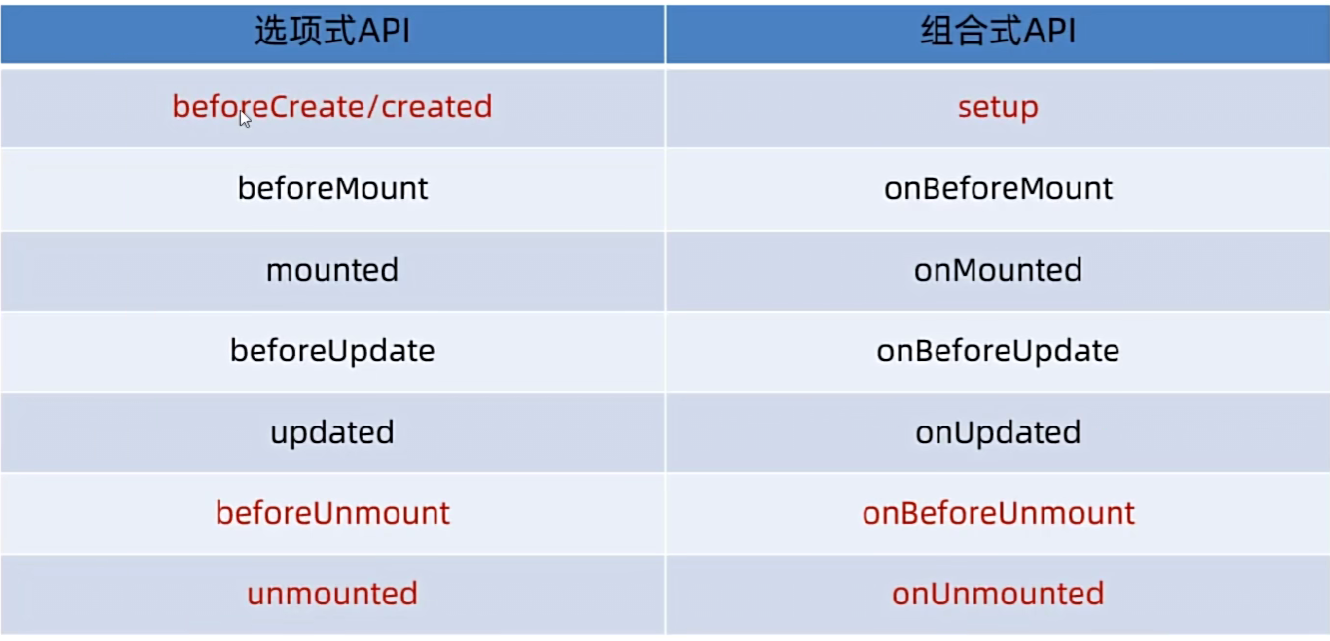
Vue3生命周期函数
使用生命周期函数记得先导入,示例代码:
<script setup>
import { onMounted } from 'vue'

// 模拟获取数据
const getList = () => {
  setTimeout(() => {
    console.log('获取数据')
  }, 2000)
}

// vue2是在beforeCreate/create钩子中发送请求的
// vue3在setup中,当前已在setup中,所以直接调用就好
getList()

// 其他生命周期函数,就直接在函数内部配置一个需要执行的函数
onMounted(() => {
  console.log('onMounted-执行1')
})
// 写成函数是可以重复配置的,执行是按从上到下顺序执行
onMounted(() => {
  console.log('onMounted-执行2')
})
</script>
<template>
  <div></div>
</template>
父传子props
父组件引入子组件能直接使用
父传子:父组件中使用自定义属性的方式进行传值
# 父组件
<script setup>
  // 引入
  import { ref } from 'vue'
  import Son from '@/components/Son.vue'

  const name = ref('kaka')
</script>
<template>
  <div>
    <!-- 传值 -->
    <Son msg="123" :name="name"></Son>
  </div>
</template>
子组件通过编译宏defineProps接收props
# 子组件
<script setup>
  // 使用编译宏接收
  const props = defineProps({
    msg: String,
    name: String
  })
  // script用 props.xxx 的方式进行访问
  console.log(props.msg)
</script>

<template>
  <!-- 在template中直接使用即可 -->
  <div class="son">子组件---{{ msg }}---{{ name }}</div>
</template>

<style scoped>
  .son {
    border: 1px solid #000;
    padding: 30px;
  }
</style>
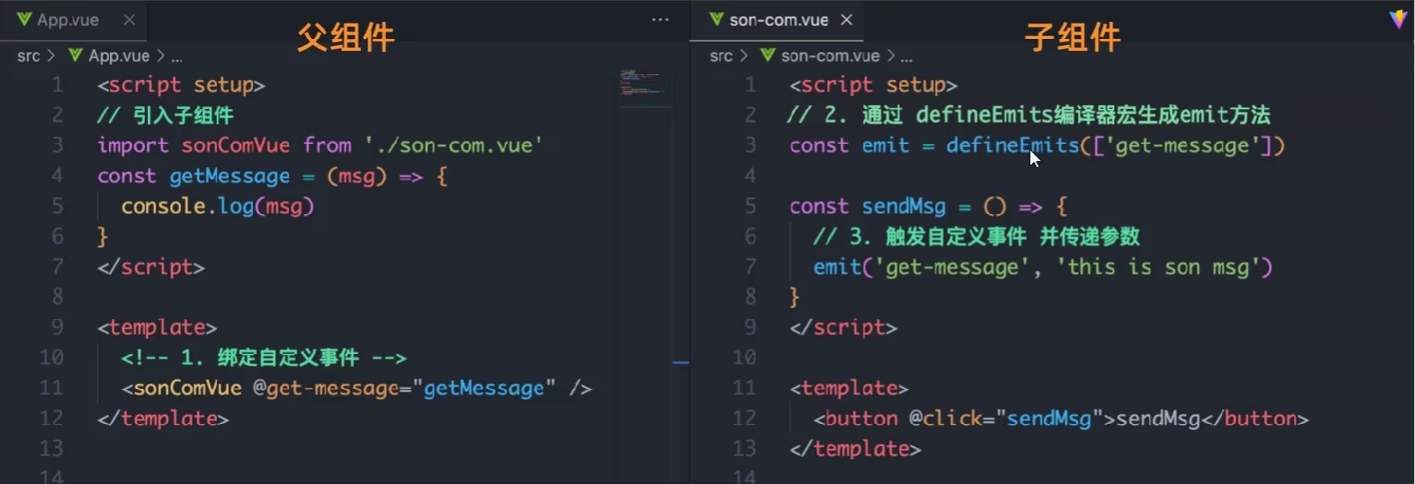
子传父defineEmits(自定义事件)
1.父组件中给子组件标签通过@绑定事件
2.子组件内部通过 emit 方法触发事件
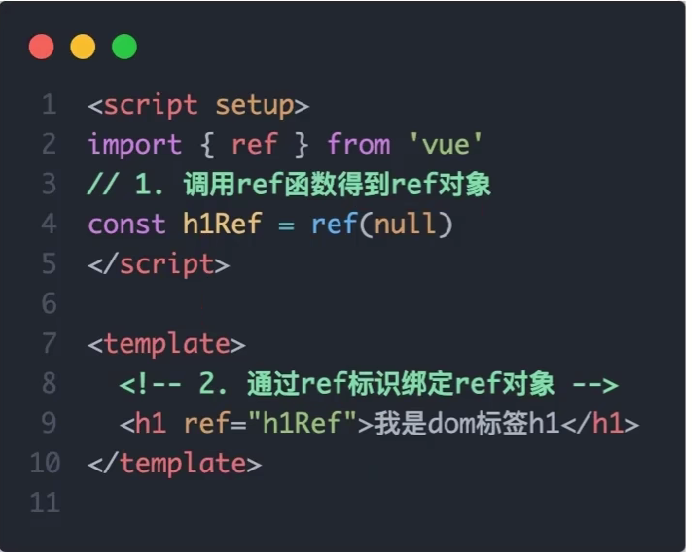
组合式API-模版引用-ref
1.调用ref函数生成一个ref对象
2.通过ref标识绑定ref对象到标签
3.通过ref对象.value获取Dom或组件实例对象(需要结构渲染完才能用,可以在onMounted中自动使用(输入框自动获取焦点),基本上绑定上了,使用点击事件就能获取)
这段代码的主要目的是:
演示如何在 Vue 3 中创建和使用模板引用。
通过 ref 获取对 DOM 元素的引用,这样就可以在 JavaScript 中直接操作这个元素。
使用模板引用的好处是:
可以在需要时直接访问 DOM 元素。
避免使用传统的 DOM 选择器(如 document.querySelector),使代码更加 Vue 化和响应式。
在需要与第三方库集成或进行复杂 DOM 操作时特别有用。
总的来说,这是一个展示 Vue 3 中如何使用 ref 来引用 DOM 元素的简单示例。
defineExpose指定组件内的方法或属性让父组件可以访问
默认情况下在 <script setup> 语法糖下组件内部的属性和方法是不开放给父组件访问的可以通过defineExpose编译宏指定哪些属性和方法允许访问
示例代码:
#父组件
<script setup>
  // 引入
  import { ref } from 'vue'
  import sonTest from '@/components/son-test.vue'

  const son = ref(null)
  const handler = () => {
    console.log(son)
    // 调用子组件的方法
    son.value.sayHi()
    // 打印子组件的num属性
    console.log(son.value.num)
  }
</script>
<template>
  <div>
    <sonTest ref="son" @click="handler"></sonTest>
  </div>
</template>

#子组件
<template>
  <div class="son">子组件</div>
</template>
<script setup>
  const num = 10
  const sayHi = () => {
    console.log('sayHi')
  }
  // 让父组件可以访问
  defineExpose({
    sayHi,
    num
  })
</script>
<style scoped>
  .son {
    padding: 30px;
    background-color: #7ad327;
  }
</style>
跨层级传递(provide、inject)
作用:快速让祖辈的组件向子孙组件传递数据(可传递普通数据、响应式数据、方法等)
提供数据:provide('数据名',数据) 接收数据:const 变量 = inject('数据名')
示例代码:
#最外层组件
<template>
  <div>
    <h1>App组件</h1>
    <Center></Center>
  </div>
</template>
<script setup>
  import Center from '@/components/center-com.vue'
  import { ref, provide } from 'vue'

  const text = '跨层级传递信息'
  // 传入普通数据
  provide('text', text)

  const num = ref(10)
  // 传入响应式数组
  provide('num', num)

  // 传入方法 ,可让子类组件修改父类中的属性
  provide('changNum', (newValue) => {
    num.value = newValue
  })
</script>

#中间组件
略

#底层组件
<template>
  <div>
    <h3>底层组件</h3>
    <button @click="handler">修改上辈传来的信息信息</button>
    <p>App 传来的信息是 - {{ text }}-{{ num }}</p>
  </div>
</template>

<script setup>
  import { inject } from 'vue'
  // 接收祖辈组件传来的数据
  const text = inject('text')
  const num = inject('num')
  const changNum = inject('changNum')

  const handler = () => {
    // 通过祖辈组件传来的方法(函数)修改祖辈内的数据
    changNum(123)
  }
</script>
Vue3.3新特性-defineOptions
有 <script setup> 之前,如果要定义 props,emits 可以轻而易举地添加一个与 setup 平级的属性
但是用了<script setup> 后,就没法这么干了, setup属性已经没有了,自然无法添加与其平级的属性。
所以在 Vue 3.3 中新引入了 defineOptions 宏。顾名思义,主要是用来定义 Options API的选项。可以用
defineOptions 定义任意的选项, props,emits,expose,slots 除外(因为这些可以使用 defineXXX 来做到)
传统的 Vue 组件定义:
在 Vue 2 和早期的 Vue 3 中,组件通常这样定义:
   export default {
     props: { ... },
     emits: [ ... ],
     setup() {
       // 组件逻辑
     },
     // 其他选项 API 的选项
   }
2. <script setup> 的引入:
Vue 3 引入了 <script setup> 语法,简化了组件的编写:
   <script setup>
   // 组件逻辑直接写在这里
   </script>
这种方式更简洁,但失去了定义其他 Options API 选项的能力。
defineOptions 的作用:
defineOptions 是为了在使用 <script setup> 时,仍能定义其他 Options API 的选项。例如:
   <script setup>
   defineOptions({
     name: 'MyComponent',
     inheritAttrs: false,
     // 其他选项...
   })
   </script>
4. "props, emits, expose, slots 除外"的解释:
对于 props,可以使用 defineProps
对于 emits,可以使用 defineEmits
对于 expose,可以使用 defineExpose
对于 slots,可以使用 defineSlots
这些特定的 defineXXX 宏提供了更好的类型推断和开发体验。
5. defineOptions 的使用场景:
主要用于定义那些没有专门的 defineXXX 宏的选项,比如:
name(组件名)
inheritAttrs
components(局部注册组件)
directives(局部指令)
自定义选项
总结:defineOptions 让开发者在使用 <script setup> 的同时,仍能够使用 Options API 的其他选项,保持了灵活性和兼容性。这对于需要定义特殊选项或与旧代码库集成的场景特别有用。
例:
组件名不符合命名规范时
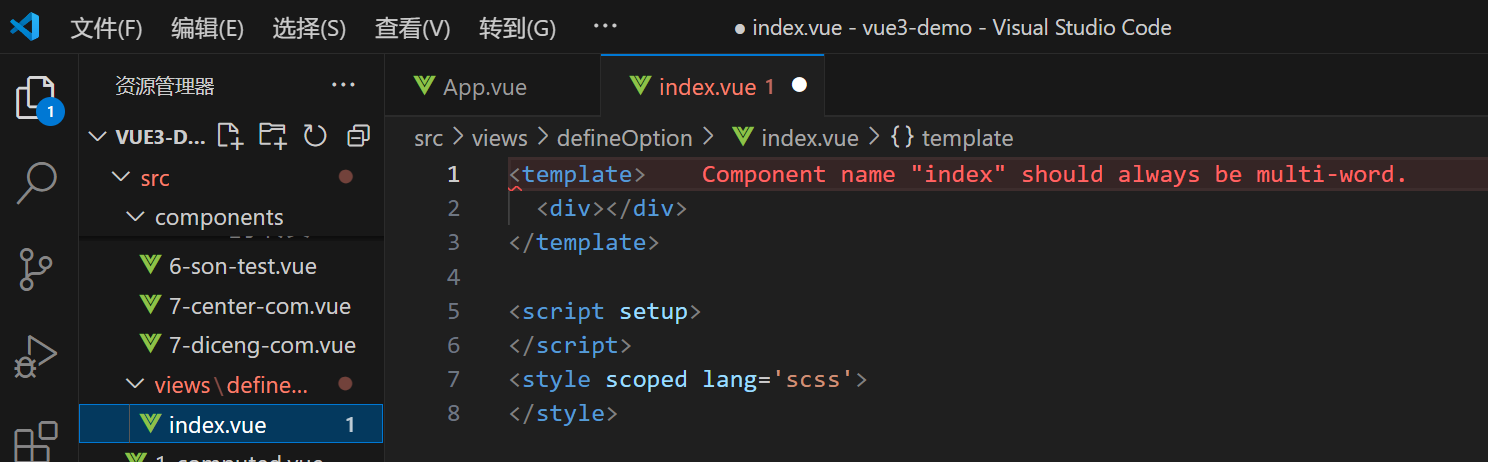
可以在配置项中配置name,改为合法的,但是这样会有两个script标签
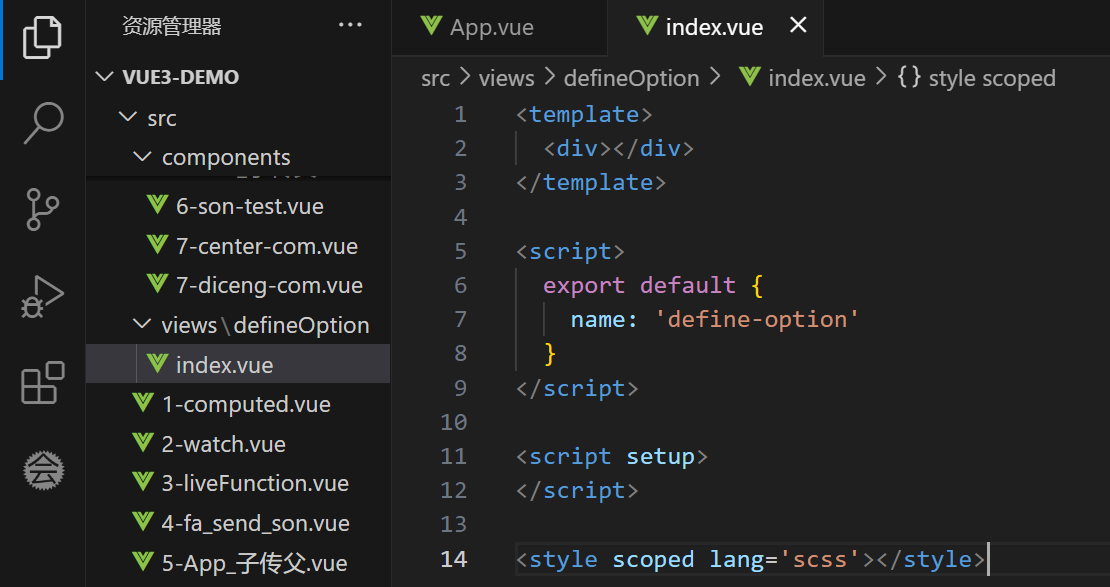
所以Vue3.3引入了defineOptions,这样就可以在 <script setup>中配置name了

Vue3.4新特性- defineModel快速实现双向绑定
Vue3中的 v-model:
在vue3中,自定义组件上使用v-model,相当于传递一个modelValue属性,同时触发 update:modelValue 事件
#Vue3中的 v-model
<child v-model="msg"></Child>
相当于
<child :modelValue="msg" @update:modelValue="function"></Child>
所以要实现双向绑定需要在子组件中用props接收modelValue,并让input事件触发update:modelValue,之后执行内置的function更改为新值
<script setup>
  defineProps({
    // 接收v-model传入的值
    modelValue: String
  })
  const emit = defineEmits(['update:modelValue'])
  const changeNum = (e) => {
    // 触发update:modelValue,并将新值传回父组件,让父组件内置的方法改变新值
    emit('update:modelValue', e.target.value)
  }
</script>
<template>
  <div>
    <input :value="modelValue" @input="changeNum">
  </div>
</template>
defineModel
子组件使用defineModel,快速实现双向绑定
#父组件内
<child v-model="msg"></Child>

#子组件
<script setup>
  const num = defineModel()
  const changeNum = (e) => {
    num.value = e.target.value
  }
</script>

<template>
  <div>
    <input type="text" :value="num" @input="changeNum">
  </div>
</template>
defineModel取名实现双向绑定
v-model:名="msg" => const num = defineModel('名',{可配置type等prop配置项})
#父组件内
<child v-model:名="msg"></Child>

#子组件
<script setup>
  const num = defineModel('名')
  const changeNum = (e) => {
    num.value = e.target.value
  }
</script>

<template>
  <div>
    <input type="text" :value="num" @input="changeNum">
  </div>
</template>
Vue3——Vue Router
基础代码解析:router.js
    import { createRouter, createWebHistory } from 'vue-router'

    // createRouter 创建路由实例,===> new VueRouter()
    // 1. history模式: createWebHistory()   http://xxx/user
    // 2. hash模式: createWebHashHistory()  http://xxx/#/user

    // vite 的配置 import.meta.env.BASE_URL 是路由的基准地址,默认是 ’/‘
    // https://vitejs.dev/guide/build.html#public-base-path

    // 如果将来你部署的域名路径是:http://xxx/my-path/user
    // vite.config.ts  添加配置  base: my-path,路由这就会加上 my-path 前缀了
	// 意思就是在配置基地址

    const router = createRouter({
      history: createWebHistory(import.meta.env.BASE_URL),
      routes: []
    })

    export default router
import.meta.env.BASE_URL 是Vite 环境变量:https://cn.vitejs.dev/guide/env-and-mode.html
.vue文件中使用
<script setup>
// 在 Vue3 CompositionAPI 中
// 1.获取路由对象 router useRouter
//    const router = useRouter()
// 2.获取路由参数 routeuseRoute
//    const route = useRoute()
import { useRoute, useRouter } from 'vue-router'

const router = useRouter()
const route = useRoute()

const gotoHome = () => {
  router.push('/home')
  console.log(router, route)
}
</script>

<template>
  <div>我是App</div>
  <button @click="gotoHome">gotoHome</button>
</template>
Pinia
什么是Pinia?
Pinia 是 Vue 的最新 状态管理工具,是 Vuex 的 替代品
1.提供更加简单的API(去掉了 mutation)
2.提供符合,组合式风格的API(和 Vue3 新语法统一)
3.去掉了 modules 的概念,每一个 store 都是一个独立的模块
4.配合 TypeScript 更加友好,提供可靠的类型推断
项目中添加Pinia
1.创建项目。
npm create vue@latest 创建vue最新版本
2.根据官方文档配置Pinia。
-
安装Pinia
yarn add pinia # 或者使用 npm npm install pinia -
引入Pinia
-
创建Pinia实例
-
vue应用Pinia
import { createApp } from 'vue'
import App from './App.vue'

// 引入状态管理工具Pinia
import { createPinia } from 'pinia'

// 创建Pinia实例
const pinia = createPinia()
const app = createApp(App)

// 应用Pinia
app.use(pinia)
app.mount('#app')
基本使用
创建管理工具Pinia——store.js,可自定义store名
// 引入 defineStore
import { defineStore } from 'pinia'

// 你可以任意命名 `defineStore()` 的返回值(对象),但最好使用 store 的名字,同时以 `use` 开头且以 `Store` 结尾。
// (比如 `useUserStore`,`useCartStore`,`useProductStore`)
// 第一个参数是你的应用中 Store 的唯一 ID。
export const useConuterStore = defineStore('counter',()=>{
  // 其他配置...
  // 声明state数据
  const count = ref(100)
  const msg = ref('hello pinia')
  // 声明actions函数
  const addCount = () => count.value++
  const subCount = () => count.value--
  // 声明getters
  const doubleCount = computed(() => count.value * 2)
  // return 返回这些数据
  return {
    count,
    msg,
    addCount,
    subCount,
    doubleCount
  }

})
组件中使用:
<script setup>
  import {useCounterStore} from '@/store/counter'
  // 创store实例
  const counter = useCounterStore()
</script>

<template>
 <div>
  我是App根组件-{{ counter.count }}-{{ counter.msg }}-{{ counter.doubleCount}}
 <!-- 直接使用store中的方法 -->
 <button @click="counter.addCount">+</button>
 <button @click="counter.subCount">-</button>
 </div>
</template>
storeToRefs让解构的数据变得可以响应式
创建实例后,解构后的数据不是响应式的,此时需要用到storeToRefs
// 当 store 中的数据过多时,我们想使用解构来替换掉 实例对象.属性 的方式来简化书写
// 但是就这样解构会导致数据不是响应式的
import {useCounterStore} from '@/store/counter'

// 此处直接解构会导致数据不是响应式的
// const {count,msg,doubleCount} = useCounterStore()

//所以此时得引入storeToRefs,来包裹这个store的实例对象,使得解构后的数据是响应式的
const {count,msg,doubleCount} = storeToRefs(useCounterStore())// 此处的数据是响应式的

// 但是使用storeToRefs包裹实例对象后,解构的方法将会触发不了
// 所以此时直接解构出来方法,不用storeToRefs包裹会更好
const {addCount,subCount} = useCounterStore()
Pinia持久化插件-pinia-plugin-persistedstate
官网:入门|Pinia插件持久状态 --- Getting Started | Pinia Plugin Persistedstate (prazdevs.github.io)
- 安装:
npm i pinia-plugin-persistedstate - 将插件添加到 Pinia 实例中
import { createPinia } from 'pinia'
import createPersistedState from 'pinia-plugin-persistedstate' //注意此处引入不要解构,VsCode引入的是解构后的,无法正常使用

const pinia = createPinia()
pinia.use(createPersistedState)
3.在声明存储时,将新的persist选项设置为true。这是默认配置,会将该store中所有的ref()数据存到本地存储。但是得经过某个值改变后(一上来是没有的,需要进行操作修改后才会存储)
import { defineStore } from 'pinia'
import { ref } from 'vue'

export const useStore = defineStore(
  'main',
  () => {
    const someState = ref('hello pinia')
    return { someState }
  },
  {
    persist: true,
  },
)
4.高级配置 (更多配置去官网看)
import { defineStore } from 'pinia'
import { ref } from 'vue'
export const useStore = defineStore(
  'main',
  () => {
    ......
  },
  {
    persist: {
      key: 'my-count',// 将本次存储的键名改为my-count
      storage: sessionStorage,// 将存储模式改为会话存储,默认为本地存储
      pick: ['count'],// 选择需要存储的state,默认是存储所有的state,4.0.2版本。之前的版本用path
    }
  },
)